Saturday 6 April 2013

Blood Bowl / Snotling Ogre Team

Hello again!

As I said in my last post, I've been packing stuff up from my carry case and putting it into storage until I need them again.  This time it's my Ogre / Snotling Blood Bowl team.  I would loooooooove to play more Blood Bowl, but nobody round my way seems interested in it these days.  I ran the league at my local club a couple of years ago, but since then interest waned so it ground to a halt... gutted!   Everyone bangs on about how good the PC game is, and how much it mimics the board game, but there's nothing quite like pitting your wits against somebody who's actually sat facing you, especially if you draw a crowd - it's all about atmosphere!


Aaaanyway...  the colour scheme is loosely base on the Washington Redskins team colours, not that I have a particular affinity with them, I just fancied a change from painting Nurgle green and I thought it looked cool, so I went for it.


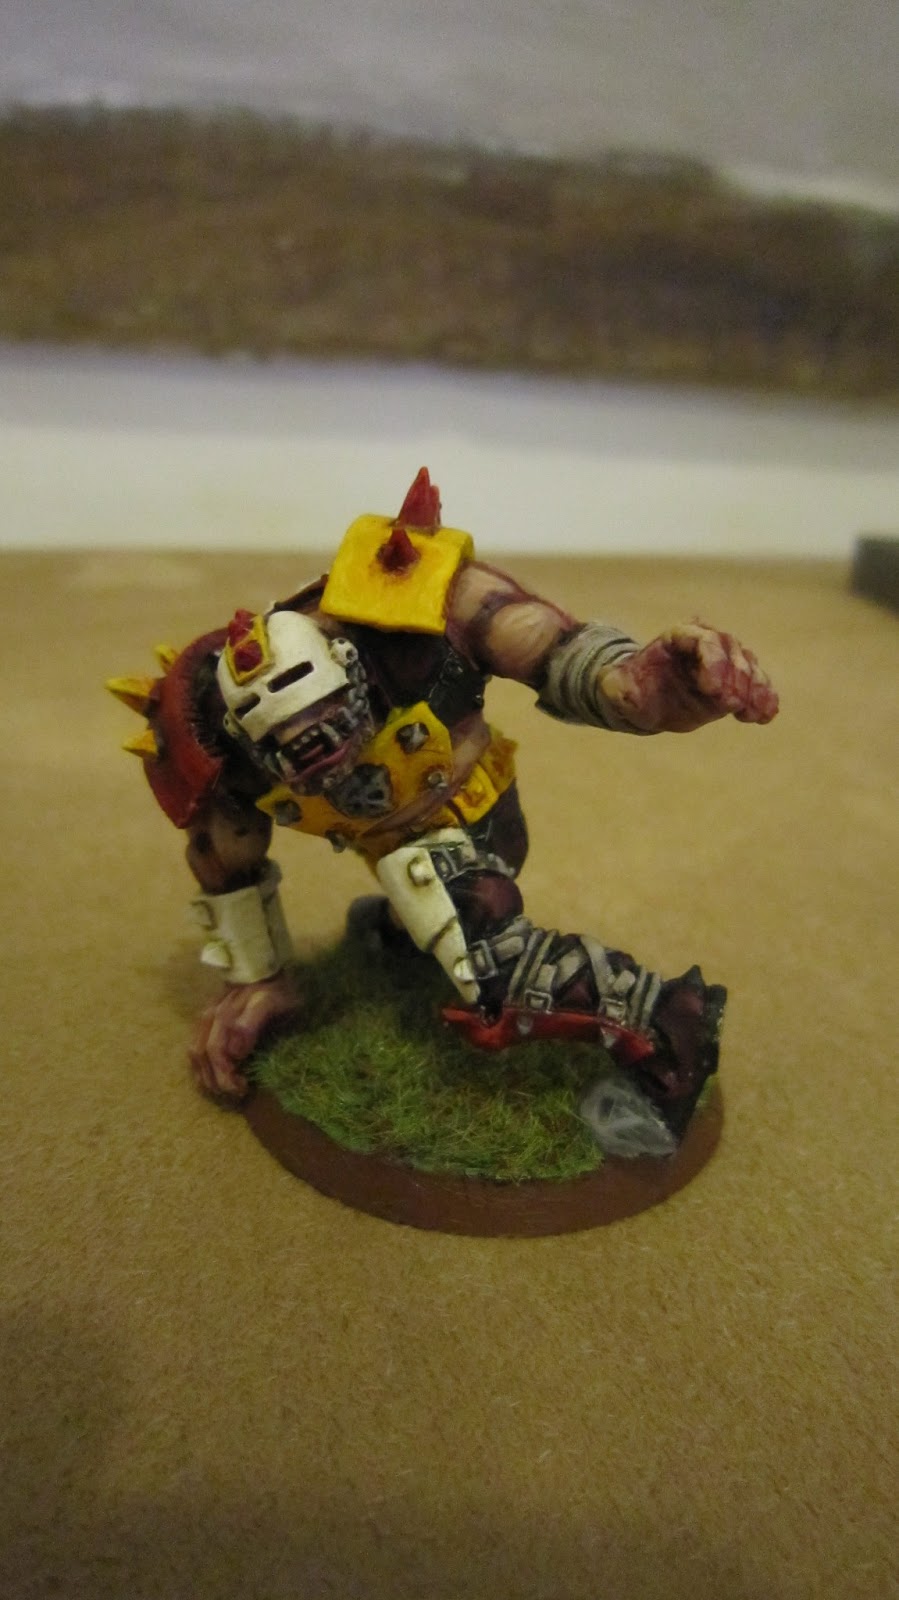
Can't remember exactly what colours I used, and this was one of my first attempts at painting actual skin (as opposed to rotting Nurgly skin) for a looong time, so the colours are a bit dull.  I loved painting the Snotlings though.  If you get the Ogre team from the GW website you get a Goblin in the pack, but the rules state that it's actually Snotlings, not Goblins, so I bought a pack to use with the team.


 I was going to convert them into proper Blood Bowl players, removing the weapons, giving them helmets etc. but as usual time was against me, so I figured that actually they'd probably turn up tooled up anyway so I just painted them as they were.


The size difference in these minis is epic, I love it.  You get the feeling that Throw Team-mate is just going to be a doddle for the big guys.  As for the team selection - I went for 6 Ogres so that a wall of meat can be placed right across the game line to prevent anyone trying to Dodge through, giving the Snotties full reign to get the ball where they want it before being chucked over the head of the opposing team and trotting over the line with it.  If you're lucky this can be a Turn 1 Touchdown... but I managed it in 2 Turns - I wasn't complaining.  It's a thing of beauty when your dice rolls align and everything falls into place!


Anyhoo - next time, some pics of my new Loyalist army....

Monday 4 March 2013

Old-school Alpha Legion Chosen Marines

Hello All!

Hmmm been a while!  Time has moved on quite a bit since my last post, and of course being the typical hobbyist, so has my focus!  Was just packing up some old minis to make way in my carry case for my (current) new project (a loyalist chapter of Space Marines!  Who'd have thought it, eh?) when I came across my much underused squads of Chosen Marines, So I thought I'd take a couple of pics and post them up here.


 I'm putting these guys away as they're a bit redundant thanks to the changes in the new Chaos Marines codex.  I mean - nobody gets Infiltrate?!  Nobody even gets Scout?!  What's going on there I really don't know, seems ridiculous to me that an entire force should lose both of these abilities - are we saying that Chaos Marines are incapable of sneaking around without being seen?  What about the Alpha Legion, FFS?!


Anyway, the whole reason behind these two units is that they were my "sneak up behind you and blow up your heavies" guys.  2 identical squads of 5 marines - one champion, 4 toting meltaguns, mounted inside a Rhino each, and Outflanking just when you didn't expect it.  A full move of 12" for the tank, followed by a swift dismount, meant that anything in the outside 24" of table was gonna get a melta round up the wrong'un.

Sadly due to the rules change this can no longer happen, losing the element of surprise means the Rhino more often than not gets taken out before getting anywhere near behind enemy lines...  so into storage they go for the time being.

As I may have mentioned I run a pure Nurgle force, but was getting a bit bored of painting green, and also I'd just read Legion, so I had (and still have) a soft spot for the Alpha Legion. Outflanking, sneaking around and blowing stuff up seems much more their tactics than the plodding antics of Nurgle, so I grabbed the Legion shoulder pads and got painting.


For some reason, in my head Alpha Legion armour is super shiny.  Don't ask me why, it just is.  I love the dark, dark blue, with green highlights and the snake-scale motif, and I just thought it needed to be polished to a high sheen, an effect that usually I can't stand, so dunno what happened there!

For anyone interested in reproducing the paintjob, all I have to say is "Good luck!" cos it's using some of my oldest paints, in fact a mix of previous generation GW paints, and first generation Citadel Inks!

I painted all the armour in Regal Blue, then went straight to Ice Blue for a highlight with nothing in between.  I then gave the whole model a wash of Citadel Blue Ink.  I then put another finer highlight of Ice Blue, again with no in-between steps.  Then I washed the whole model again in Citadel Green Ink.  I then painted the scales, chapter number and hydra head using the same base of Dark Flesh, mixing through to Knarloc Green and highlighting with Rotting Flesh.  Then I used the classic Boltgun Metal, Badab Black Wash, more Boltgun Metal, Chainmal, Mithril Silver combo to edge the armour.  Finally I painted the blue armour parts in GW's shiny varnish and that was it.

They were painted pretty quickly as I was desperate to get them into a game, so apologies for the splodgyness in some places!


Anyway there you go - got some other pics to put up of one of my Blood Bowl teams, so there'll be a new post soon!

Saturday 25 August 2012

Dire Avengers

Just a quick post of some Eldar Dire Avengers I've been taking bloody ages to finish.  I was all about to start an Eldar army - bought loads of plastic, then good old GW start churning out new Daemons and Chaos Marines models... with the promise of a new Codex later this year... Looks like these guys are going to join their Guardian brethren in a box under the bed for a bit.

Hey ho, here they are! =)


Monday 13 August 2012

40K Chaos Marine NERF Bolter - Part 5

Paaaaaint!

So, you know how if you're running Space Wolves, and everyone says to you "Hey, why are you even painting them, they're grey!  Just leave the original plastic, stick a wash on it and you're done!"?  Well, guess what?  I found myself in the same situation here.  Painting aluminium a nice even silver colour!  I did wonder at myself as I did it, but then I was also covering up all the filler, the black of the barrel and whatnot... Plus I knew I was going to weather it pretty heavily, so it would come good in the end. "Good job it's Chaos" as they say...

The outer casing I wanted to do with the classic yellow on black hazard stripes, a nod to the Iron Warriors or Alpha Legion (who are one of my fave chapters).  So here is the base-coated model before weathering.


Mmmmm shiny!  But not for long!  Note also the front grip in this photo - it's been painted with rubberised paint (as has the trigger grip).  I used Plasti-Dip for this, which worked pretty well but took a few coats.  You can also see the slider over the bullet casing exhaust slot.  This side slides back to allow access to the Nerf's own inspection chamber.  The one on the other side is fixed in place.

Before painting I gave the whole model a coat of "special metals" primer.  Aluminium is a funny old beast, and I didn't want any paint flaking off afterwards.  The yellow paint took a couple of coats to get even, but the black stripes went on with just one coat - something that would prove to be a bit of a gift during the weathering process...

So - I've painted a fair few miniatures, but never anything this size.  I have to say I was a bit daunted about the whole process.  Usually the way I'd go about it is whacking a wash over the whole thing, then adding some weathering powders in pertinent nooks and crannies etc.  Problem is there's loooooots of big flat surfaces here so it could get a bit tricky.

Anyway I did a bit of reading up in the old Forge World Model Masterclass book, and decided to bite the bullet.  I found some old coffee-coloured gloss paint at the back of the workshop cupboard (I dunno where that came from!  Who paints something gloss brown?!) and darkened it up a bit by spraying some black paint into it.  Then I chucked in a load of white spirit until it was a nice wash consistency.  Then I got an old paintbrush and slapped it on, hoping for the best.

The first thing that happened was that it was a bit thin, and a lot of it ran off before it could dry - being used to acrylic drying times through me a bit of a curve ball there.  So I thickened it up a bit and splodged it on again in a few areas.  The second thing that happened was that the white spirit thinned down the black stripes so much that they started to come away - they'd only had the one coat after all.  Fortunately the yellow stayed true as it had had a few coats.  Now you might think that it might be a bit upsetting, but it gives such an awesome aged effect on the stripes that I was well pleased!  Bit lucky, but I'll definitely remember that for next time...  (Yes, already thinking 3 projects in the future - isn't everyone?)

So next, a bit of rusting.  I dug out my Burnt Umber oil paint and rust-coloured weathering powders.  Plus added in a bit of Yellow Ocre for good measure.  I made up a suitably rusty coloured mix - I can't give you the exact recipe because I fiddled with it until it looked right, plus everyone has their own idea of what a good rust pattern is, don't they?  If you're going to try this, just keep fiddling until it feels right.  There's an actress and bishop joke in there somewhere... ; )

When I was happy with the mix, I got the trusty old toothbrush out, got a brushful and flicked it onto the model with a bit of aluminium off-cut.  This gave me a nice random pattern that I could adjust as I went along, building it up in layers.  Finally I thinned the mix down with white spirit and added it here and there in places that looked like they needed dirtying up a bit.

Here's the final effect.


The only problem is that all that white spirit has made the Plasti-dip a bit sticky.  I'm hoping it's going to dry again in a few hours, or that it will take a coat of varnish and harden up a bit.  At this point I'm not that fussed if it's rubbery in texture, just as long as it doesn't give me sticky fingers!


The red-dot sight was a cheap plastic gem I picked up in Hobbycraft for a couple of quid.  It does a pretty good job of catching the light considering it cost next-to-nothing.  The white line of glue around it is still drying - it dries clear.


So there ya go - it's all over bar the varnishing.  When it's applied and dried I'll try to get a vid sorted of it shooting at stuff and upload it here.

Hope you guys like it - feel free to post comments, ask away with any questions - always happy to chat about hobby!

Cheers

A$H

40K Chaos Marine NERF Bolter - Part 4

Okay.  It's time to use your imagination!

Imagine if you will, Ash in his workshop, his brow furrowed in concentration, scribbling wildly on a pad of paper, sharpening his pencil with a craft knife.  He is diligently working on the plans for the Nerf Bolter - reverse-engineering the shape of the front grip, working out it's dimensions, then tracing out the plan onto aluminium sheet and bending it into shape.

Then, he turns his attentions to the outer shell of the bolter - working out how to build the inner curve to fit around the circular dummy switch above the trigger, once more returning to the pad to plan and plan again.  Next, he creates the sight rail on the top of the outer casing, sketching blueprints, cutting metal, bending, drilling, riveting, filling, sanding!  His mind and hands are a blur of motion, working together with purpose as never before!  The sweat beads on his brow!  The fire of passion burns in his eyes!  And then...!

He sits back in his chair... his energy spent, his creative urges sated, a tired smile of satisfaction on his face....

I ask you to imagine this scene, dear reader, as I made the mistake of leaving my neighbour alone with my laptop.  I returned to find it innocently asking me for the admin password, something it's never needed before, asking for information that I just don't have....  <hangs head, sighs, nurses temples with pointed fingers>

BUT a light bit of laptop rebuilding later I'm back up and running, but sadly the intervening step-by-step images have been lost to the warp.  So - here is the finished product before it went to paint:-


As you can see - the grip and the outer casing were another case of box-building.  They are bolted (not riveted) to the body casing using the same bolt locations as on the original model.  That way I can unbolt them and fix any internal problems if need be, and also replace the batteries that are now housed in the front grip.

Once you get the hang of this box-building lark it's pretty straightforward, but the sight rail was a bit of a challenge.  The rail itself was pretty easy, being just an oblong, and the rear end cap was okay too.  The three spikes weren't too bad, but needed a couple of attempts at test mock-ups in cardboard beforehand.  Testing in cardboard is a good way of getting the hang of this as it's a lot easier (and cheaper) than getting it wrong over and over again in aluminium.  Once I'd got something I was happy with I used it as a template to make the three identical spikes.

The front end of the rail, with the raised sighting point was really tricky.  What threw me out a bit was getting the curves right.  The twin curves from the front that go up to the flat square top, and then the swooping curve down the back of the piece to join the main oblong of the rail.  I'm sure it could have all been worked out using maths, but I'm much more of a "crack on with it and see what happens" kind of bloke, so there was a certain amount of trimming bits off, swearing, riveting, filling, etc. etc. until it looked right.  Another case of "Good job it's Chaos..."!

You might have noticed that the front grip is a bit deeper than on the original template  - that's because there's just not enough space in there to put 6 x size D batteries in a row, so they had to go in a box-shape, which pushed the bottom of the box down a bit to accommodate them.  Another minor compromise...


Fortunately the length of the original Nerf clip wasn't a problem.  I initially thought I was going to have to somehow engineer a new magazine that was curved to fit with the style of the gun, but as it turned out there is so much space between the bottom of the Nerf gun and the bottom of the body casing that it only stuck out a couple of inches.  This meant that I could mock up that curved magazine out of ally sheet, leaving it hollow, so it just slots over the existing clip and into the bottom of the body casing.

So yeah - ready for paint! =)

40K Chaos Marine NERF Bolter - Part 3

Righty - time to chop up some metal!

So the first thing I did was cut out the two side panels as we worked out in Part 2.  Then I took a hacksaw to my shiny new Nerf gun and hoped for the best.  This is was the chopped-up Stampede looks like inside the body casing.


You can see the wiring I extracted from inside the gun - the battery terminals hanging down behind the grip and the switch sitting just above it.  Here's the outside strip of ally clipped in place around the casing.


As you can see I left a small lip around the outside I was intending to weld these bits to the strips that would run around the top and bottom of the casing.  While I've got some experience in welding (Gas and Mig) I've never welded ally before, and let me tell you folks - it's a bitch.  Don't do it!  It's too hard!  Certainly was for me anyway... I wasted a LOT of time trying to get it to hang together.

In the end I said "Sod it!" and pop-riveted the whole thing together, then hid the rivet heads with some filler and a bit of sanding.   Good job I left that lip there or I'd have had nothing to rivet to and it would have been back to the drawing board.  This was probably the first time I said "Hey ho it's supposed to be a Chaos Bolter so it's not supposed to be immaculate!".... but definitely not the last!

Next, I had to source some tubing to make the barrel and red-dot sight.  The red-dot thing was pretty straight froward as I had just the right size tube lying around (this happens surprisingly often in my workshop - all those years of hoarding everything "just in case" finally paid off!  Husbands! Run and tell your wives! It's okay to have a shed full of crap!).

It took me ages to decide on the width of the barrel - some tubing was the right width, but the interior thickness was way off, other stuff was thick enough but wasn't wide enough.  Eventually I settled on a bit of old drainpipe I has lying around - it's not as thick as I'd like it to be, but I managed to use a joint section and slot another tube inside to make it double it's original width.  I didn't want this project to break the bank and looking at the cost of tubing (and the materials it's made from) I decided it wasn't worth the hassle and cost of sourcing something else.

Then I set about making a couple of switches - one for the power, just above the grip, and the other for the clip release.  When I was at school we did a project that involved taking cardboard boxes apart and working out how they look when flattened out.  It must have been over 30 years ago but let me tell you it paid off!  I worked out the final shape I was looking for then reverse-engineered it using pencil and paper until I was pretty sure I'd got a final plan, then traced it out onto the ally and went at it with the clippers. Somehow it all came together and I was able to create a couple of half-decent switches.  phew!

Here's how the final-fit of the body panels look.


You can see the power switch above the grip, but the clip release hasn't been fitted yet.  You can also see the drainpipe barrel (yes I am embarrassed to type that - how cheap am I!?) and also a hole I cut to get at the jam-clearing panel on the gun itself.  I'm going to use one of the bullet-casing exhaust ports on the outer casing of the bolter as an inspection panel so I can get to this - no point having the whole thing jam and not being able to clear it cos it's all riveted up!

You can also see the battery pack from the original Nerf gun that I was using to do some test firings with.  This will get replaced in the final version as it's just too big to fit into the front grip.

And yes, you can also see the round knob on the back is supplied by a "well-known brand of mustard manufacturer"!! ; ) Every time I see this picture my mind wanders and I start craving pork pie.... *sigh*

Next time - the finished article!